Thursday, 18 February 2016

Beautiful Bunya's

This is a great time of year for feasting. But my favourite dish at the feast has to be the Bunya Nut. Native to south East Queensland these ancient pine trees drop enormous pine cones loaded with enormous pine nuts. Just watch out for your head when you are collecting them.


This year there has just been a small harvest. We are lucky enough to know a land owner with a good stack of them on his land, however lots grow along the roadsides and drop their nuts on the nature strip, so for those wild foragers out there, these are for you. Once you know their distinctive shape you can't miss them. We usually have enough to pickle so we can snack on them all year. They can be shelled and frozen too if you have the space. We generally just eat them with butter salt and pepper, however they are versatile and I have heard of them being blended up and made into a cream which can be eaten on cakes. Our little boy is a bit obsessed with them and loves helping his dad to break open the cones and remove the nuts from their casings.

Colourful Casings


Nuts in shells waiting to be cooked
 To cook -  Put the amount you want to eat, still in their shells in water and boil gently for half an hour. After the time has passed drain the water.


Pinch the nut between your fingers so a small gap opens in the top.


 You will see a line where sections of the shell join, cut along that line, being careful not to cut your fingers. Cut to the base of the nut.


Pull the halves apart. To remove the larger part of nut pull the sides of the shell apart or cut a groove at the bottom of the shell.


Put the nuts in a bowl with melted butter, salt & pepper and enjoy. I personally prefer the younger softer more slimy ones, which are amazing and tender, whereas my other half likes the harder slightly drier ones. Needless to say they are rather filling and don't be tempted by their deliciousness to scoff them too rapidly, which I shamefully admit to doing as they can be rather hard to swallow. How amazing are they, they even promote conscious eating.

Monday, 4 January 2016

Making Our Daily Brew.

Whilst pregnant I had steered clear of coffee and post pregnancy I had a couple of cups but combined with the sleep deprivation and actually not being used to coffee, it seemed to turn me into an emotional wreck. Yeah blame the coffee...
Consequently I thought that me and coffee were going to part ways, I was especially gutted since 'they' had just decided that coffee was actually good for us.


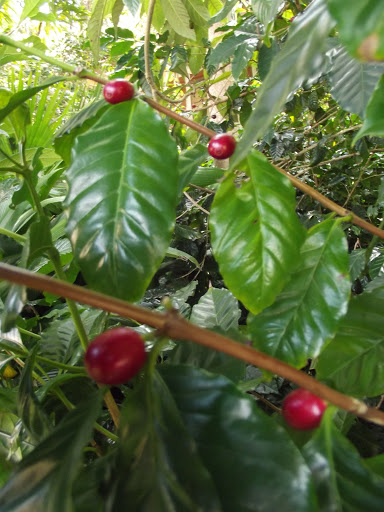
However my neighbour is cultivating a small rainforest for a garden ' Daintree Gardening' is how he describes his style. He has lots of coffee plants in his rainforest and they grow the most lovely red fruit. 


He asked us if we would like some, so we went over and picked a bucket full.


We covered them with cold water and let them sit for a few days. They softened up and started to ferment.


Then we removed the seeds from the pulp. It was quite easy, you just needed to squeeze one end of the berry and the seeds squirted out.


We placed them on dehydrator trays and put them out in the sun to dry. We brought them in at night. We dried them for approximately three days, until they felt nice and dry when we ran our fingers through them.


We had read that you only want to roast them for twenty minutes, the variable for the darkness of the roast is the temperature. We put our oven up to about 220 centigrade, we were aiming for a dark roast. We placed the beans on oven trays in the middle of the oven.

The aim with roasting coffee beans is to get an even roast, often that involved lots aeration in a professional machine. We decided that the best we could do regards aeration would be to remove the trays every five minutes and move the beans about in the hope they would roast evenly.


We achieved a rather dark roast.


Coffee beans continue to cook unless they are rapidly cooled down.


We moved the beans back and forwards between a sieve and a pan to help cool them. Done vigorously this should help remove some of the chaff. Though chaff doesn't affect the final flavour, so we didn't try too hard to remove it.


We let the beans cool then ground them. The flavour matured as the hours passed by. Supposedly 24 hours after the roast the coffee will be at its best, after which the aroma will start to fade.

For a first attempt we were really pleased with the result. Using a stove top espresso maker we brewed our coffee and mixed the Espresso with a little water, brown sugar and milk. Mmmmm it was delicious. I had the remnants of a bag of shop bought coffee in the fridge so I decided to make a comparison brew... oh what vile flavourless muck it was.
We have both become coffee fiends ever since and are looking at our jar of ground coffee as its contents dwindle, fearing the day that it runs out. We have even planted six coffee trees in our garden, fortunately as a rainforest tree they grow well in shaded areas which had otherwise been going to waste. I must admit that I do feel a little wired and think it may be a good thing when the coffee runs out. I have heard that in cider producing regions the locals binge for a few weeks at end of brew time then stop for the year, which gives their bodies time to recover from the abuse. I think that is probably how we ought best manage our coffee habits; binge for a month then be calm for the rest of the year, until harvest time rolls around again.


Making Mayonaise

Although obviously I am super wholesome and healthy in most ways, I do have the odd vice and one of them is a love of mayonnaise. Now for some odd reason I had it fixed as one of those things that is really hard to make and so subsequently you always have to buy it. How wrong I was, its actually rather easy.
 I recently had to replace my blender and so bought a hand held one with a mini blender bowl attachment at the bottom. When looking for things to blend I stumbled upon a few recipes for mayonnaise and so decided to give it a go. The basic recipe went something like this:

1 egg at room temperature. (lots of recipes just use egg yolk abut I found that its simpler and less wasteful just to use the whole egg and it still works well)
1 tsp Dijon mustard ( you can increase this as you start to find the taste you like)
1tsp pink salt/ sea salt
1 tsp brown sugar
300ml oil, (olive oil gives a very rich slightly bitter flavour, sunflower allows the other flavours to come through but is very high in omega 6. I have never tried coconut oil but I suspect that would work. There is probably lost of room for experimentation with different oils)
2 tbsp. white wine vinegar/ lemon juice or mixture of the two.

Lemon & garlic Aioli

Just blend the egg, mustard, salt and sugar together about 20 seconds. Then slowly add the oil, bit by bit, blending for approx. fifteen seconds between additions. The mayonnaise will start to form and make a white creamy stiff mixture. Then add the vinegar/lemon juice and mix until thoroughly combined. There you have it lovely mayonnaise simple and easy.

You can of course add additional flavours. For Lemon Garlic Aioli just add a few garlic cloves and some preserved lemons (omit the salt) in the first stage and use lemon juice instead of vinegar or add chives and whichever herbs you fancy at the end stage for a herb infused mayonnaise. Refrigerate, it should keep for a few days.

Please remember to  mention to any guests who are pregnant that the mayonnaise is homemade and contains raw egg.

You can make mayonnaise with a hand whisk, same order it just takes a little longer.


Thursday, 15 October 2015

Freshly Laid Egg Omlette, Rice and Lentil Salad


Just as we were starting to think that our hens were never going to lay anymore eggs ever again, they ended their winter drought. I couldn't just let these beautiful eggs be absorbed into a meal, they had to be the feature, so I decided to make a rice and lentil salad garnished with golden omelette.

Beautiful ladies. We are keeping them unnamed out of superstition. We did have four and I started to tentatively play around with some names for them. No sooner did I do this than two got colds and died.


Ingredients -

Quantities are approximate, use more or less depending on how fresh and intense you want the flavours to be.

Medium grain brown rice - enough for 4 people
1 can lentils or 200g cooked green or brown lentils
200g pitted Kalamata olives, chopped in half
1 handful parsley - chopped
1 handful mint -chopped
1 handful basil - chopped
half a large continental cucumber - diced
1 little gem lettuce, chopped roughly
1tsp Cumin
1tsp Paprika
A liberal drizzle of olive oil
juice of a lemon/lime
2-4 eggs
splash of water
Salt and Pepper to taste

1. Cook the brown rice. If using dried lentils they can be cooked with the rice
  as long as they have been pre soaked.

2. In a large serving bowl combine the rice and the lentils. Add the rest of the ingredients except the eggs and splash of water. Stirring thoroughly after each addition.

3. I wanted to be able to enjoy the full flavour of these fresh golden eggs so I didn't season or add herbs. Break the eggs in a bowl. Beat lightly, add splash of water. Put a little oil in a frying pan, heat to medium heat. Pour egg mixture into pan, if using small pan and four eggs just do half at a time. make sure egg mixture has evenly dissipated, roll egg around to let any excess move to the edges. Once egg has set remove from heat or if you prefer flip over and cook briefly. Cut omelette into rough squares.

4. Serve rice salad onto plates and garnish the top with the omelette squares.

Thursday, 1 October 2015

Baked Banana Cheesecake with Homemade Base

Time for a bit of indulgence, its cheesecake time.

Finding that I had an abundance of cream cheese that I had made myself, I decided it was time to make a baked cheesecake. Delicious dessert, beloved in my childhood years, its been too long.
I set about gathering the ingredients and for the base I was going to use the supposedly labour saving method of breaking up biscuits and adding butter, but unfortunately the super market had nothing wholesome enough or if it did they were contained within oodles of packaging. So when I got home I decided I would just make some of my own and crush them up etc. Then I started thinking about all the wasted oven energy and decided to experiment with just using in the raw biscuit mix for the base and cooking the whole thing together. I have never seen such a recipe before, but I am please to say it worked really well plus it meant I had full control of the ingredients I used for the whole thing. The biscuit recipe I used is quite tasty, however it might be a bit sugary for some tastes, in which case just used less sugar.

Ingredients

Biscuit Base

125g butter
200g brown sugar
1 egg
250g brown self raising flour
25g (approx.) LSA

Cheesecake Filling

500g approx. cream cheese (ideally home made)
100g brown sugar (can be decreased if banana is lovely and sweet)
1 banana
1/2 cup sour cream
1/4 cup cream
3 eggs

Method

1. Start with the biscuit base. Cream together softened butter and sugar. Add 1 egg, combine. Add flour & LSA and mix in thoroughly. Place in freezer to chill quickly.

2. Blend or mash banana thoroughly. Add creams. Blend together. Add sugar, blend together. Add cream cheese. Blend into mixture. Add eggs slowly, combining each with the mixture thoroughly before adding the next. It should be quite runny and not lumpy. Refrigerate

3. Remove biscuit base from freezer and pack into greased cake tin using hands. I used a 24cm diameter quiche dish, Though if I had one I would probably have used a cake tin with removable base. Sculpt a flat base and walls around the edge (0.5-0.7 cm thick). Put back into the freezer.

4. Turn on the oven, set it to 160 degrees centigrade.

5. Remove filling from the fridge, give it a quick stir to make sure it is well combined. Remove the base from the freezer it should be nice and firm. Pour the filling into the dish with the prepared base.

6. Bake in the oven for 50 mins to 1 hour. The centre should be firm and jelly like when cooked.

7. Leave to cool, if you can and refrigerate. For best results leave it to sit overnight in the fridge.

I had planned to keep my cheesecake eating a secret from the world, but it was so tasty I just had to share. However it was too late for any photos of the masterpiece intact